How to Use Google Docs for Collaborative Study Groups
Learn how to use Google Docs for collaborative study groups, from shared notes to question banks, and make group exam prep more effective for everyone.
Table of Contents
- Setting Up a Shared Google Doc Study Guide for a Group Exam
- Create a Master Document With a Clear Table of Contents
- Assign Ownership by Section
- Use Headers and Structure Aggressively
- Using Comments and Suggestions for Peer Feedback on Study Notes
- Comments as a Disagreement Resolution System
- Suggestions Mode for Editing Others' Work
- Resolving Comments to Mark Progress
- Building a Collaborative Question Bank in Google Docs
- How to Structure a Question Bank Document
- A Simple Format for Easy Contribution
- Testing Each Other With the Question Bank
- Integrating With Spaced Repetition Tools
- Making the Collaboration Actually Work
- The Advantage of Collaborative Building vs. Individual Studying
Study groups have always had a reputation problem. In theory, they sound great: you pool knowledge, fill each other’s gaps, keep each other accountable. In practice, they often devolve into socializing sessions with occasional panicked glances at a textbook. The problem is usually not the people involved. It is the lack of structure and shared tools.
Google Docs is not a flashy study app. It does not have AI-powered spaced repetition or gamified learning modes. But it is free, it is real-time collaborative, everyone already has it, and with the right structure it can transform a study group from an unfocused gathering into a genuinely high-output exam preparation machine.
Here is how to actually make it work.
Setting Up a Shared Google Doc Study Guide for a Group Exam
The first thing most study groups get wrong is creating one massive document and dumping everything into it. That produces a wall of text that nobody reads. The key is structure from day one.
Create a Master Document With a Clear Table of Contents
Start with a single master document that serves as the navigation hub. At the top, put a table of contents with links to each section of the exam syllabus or course outline. Google Docs allows you to create internal links using headings, so any member of the group can jump directly to the section they are working on or reviewing.
The structure should mirror whatever the exam or course uses as its organization. If you are studying for a professional certification with five domains, your document has five main sections. If it is a university course with twelve lecture topics, your document has twelve sections. This seems obvious, but a lot of groups start with random headings that made sense to whoever created the document but confuse everyone else.
Assign Ownership by Section
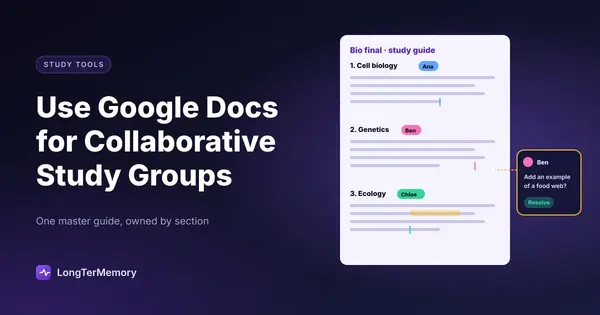
One of the most effective ways to use a collaborative Google Doc is to assign each person in the group primary ownership of one or two sections. This does not mean only that person contributes to those sections, but it means someone is accountable for making sure the notes are complete, accurate, and review-ready.
This division of labor has a powerful side effect: the person responsible for a section has to understand it deeply enough to write about it clearly. Teaching something to others, even in written form, is one of the most effective active recall techniques available. The act of writing clear explanatory notes forces you to identify and resolve gaps in your own understanding.
At the same time, everyone else reviews and annotates each section using comments. When you read a section someone else wrote and you notice a mistake, an important omission, or something you remember differently, you leave a comment. This creates a built-in peer review process that improves the accuracy and completeness of your shared notes over time.
Use Headers and Structure Aggressively
Long paragraphs of prose are hard to use as study material. Structure your Google Doc contributions with H2 and H3 headings, short paragraphs, bullet points, and tables wherever you are comparing multiple items. This is not just for aesthetics, it reflects how good study notes should be organized: in retrievable chunks that your eye can scan.
Good study note structure looks like:
- Concept name as a heading
- One to two sentence explanation
- Key points in bullet form
- An example if needed
- Common exam traps or misconceptions
This format makes the document useful both as a quick reference during review and as a source for generating flashcards later.
Using Comments and Suggestions for Peer Feedback on Study Notes
The comment and suggestion features in Google Docs are the most underused features for collaborative studying, and they are genuinely powerful when used correctly.
Comments as a Disagreement Resolution System
When you read something in the shared document that you believe is incorrect, leave a comment. Tag the person who wrote it if the document is large and it might get missed. Write specifically what you think is wrong and why. Include a reference if you have one.
This creates a conversation within the document that produces better notes for everyone. It also forces both people to go back to source material and verify their understanding, which is exactly the kind of active engagement that produces real learning rather than passive reading.
A norm worth establishing in your group: never just delete something you think is wrong. Leave a comment explaining why. This respects the work that went into the original note and ensures the issue gets resolved rather than just suppressed.
Suggestions Mode for Editing Others’ Work
When you want to directly edit someone else’s section, switch to Suggestions mode instead of editing directly. This is available in the top right of the document via the pencil icon dropdown. In Suggestions mode, your changes appear as color-coded proposals that the section owner can accept or reject.
This approach preserves the original text while clearly showing the proposed improvement, which makes it much easier for the section owner to evaluate whether your change is correct before accepting it. It also creates a visible record of what changed and why, which is useful if the group needs to revisit a decision about how to explain something.
Resolving Comments to Mark Progress
As comments are addressed and resolved, mark them as resolved using the resolve button. This keeps the document from becoming cluttered with old discussions and gives the group a visual sense of how much of the content has been reviewed and verified. An unreviewed section is one with open comments. A clean section means people have read it, flagged issues, and resolved them.
This seems like a small thing but it matters for morale. When you can see that 80% of the document has been reviewed and cleaned up, the group has clear momentum. It turns the prep process into something with visible progress rather than an indefinite task.
Building a Collaborative Question Bank in Google Docs
This is the feature that most study groups miss entirely, and it is arguably the most valuable thing you can build together.
A question bank is a collection of practice questions with answers. When your group builds this collaboratively, you end up with a much larger and more varied question set than any one person would generate alone. And the process of generating questions is itself a powerful study technique: you have to understand the material well enough to know what a good question would look like.
How to Structure a Question Bank Document
Create a separate document for the question bank, distinct from your study notes. Organize it to mirror your study guide, with questions grouped by topic or domain.
For each question, include:
- The question itself
- The correct answer
- A brief explanation of why it is correct
- (Optional) Why common wrong answers are wrong
That last element, the explanation of distractors, is especially useful for multiple-choice exam prep. Understanding why wrong answers are wrong is different from knowing the right answer, and the distinction often matters on actual exams.
A Simple Format for Easy Contribution
To make it easy for everyone to contribute questions without formatting debates, agree on a standard template and put it at the top of the document:
Q: [Question text]
A: [Answer]
Why: [Brief explanation]
Keep the template simple. The goal is to lower the barrier to contributing so that adding questions feels effortless. If the format is complicated, people stop adding questions.
Aim for each group member to add five to ten questions per week during the study period. Over four weeks of prep with four people, that is eighty to one hundred and sixty questions, a genuinely useful practice resource.
Testing Each Other With the Question Bank
Once the question bank has enough entries, schedule sessions where the group tests each other. One person reads questions while others answer. Rotate who is “quizmaster.” When someone gets something wrong, explain the answer and flag the question for extra review.
You can also use the question bank individually by hiding the answers (print it out, or use a browser extension that blocks text) and testing yourself against it. The group-generated nature of the questions means you will encounter perspectives and formulations you would not have generated yourself, which tends to surface gaps in your understanding that your own questions would never have caught.
Integrating With Spaced Repetition Tools
Once you have a solid question bank, consider converting the best questions into flashcards using a spaced repetition tool. You can do this manually, or you can use a platform like LongTerMemory which can ingest documents and generate flashcards automatically. Export or copy your question bank content, feed it into the tool, and let the spaced repetition algorithm schedule your reviews at optimal intervals.
This is where your collaborative effort in building the question bank pays compounding dividends: every person in the group gets the benefit of the full bank’s worth of questions, processed through a scientifically optimized review schedule.
Making the Collaboration Actually Work
Beyond the technical setup, a few group norms make a big difference in whether collaborative studying produces results.
Set a contribution deadline for each section. “Have your notes on domains 1 and 2 in the doc by Thursday” is much more effective than “work on it when you can.” Deadlines create accountability and ensure the document is useful before the exam, not the night before.
Do a weekly group review call. Spend thirty to forty minutes once a week going through what was added, resolving outstanding comments, and checking on the question bank count. Keep it focused on the document, not on chatting. These calls create the social accountability that turns individual contributions into a team effort.
Establish a quality bar. Vague notes benefit no one. If someone adds “Chapter 5: important” without substance, that needs to be flagged. Set an expectation from the start that notes need to be specific and actionable. What does the concept mean? How would it appear on an exam? What are the common mistakes people make with it?
Acknowledge good contributions publicly. When someone writes an exceptionally clear explanation of a difficult topic, call it out in the group chat. This is low-cost positive reinforcement that sustains motivation over a long study period.
The Advantage of Collaborative Building vs. Individual Studying
Here is the thing that makes a well-run collaborative Google Doc more powerful than individual studying: you benefit from other people’s knowledge gaps as much as your own.
When you study alone, you tend to avoid the things you find confusing. It is human nature. The difficult sections get less time than the comfortable ones, even though they are exactly where the most work is needed. When you study collaboratively and everyone is adding to the document and leaving comments, the hard parts get flagged repeatedly. Multiple people admit they are confused about the same concept. That visibility makes it impossible to skip.
There is also the simple fact of exposure to different explanations. A concept that does not quite click when you read it in a textbook might suddenly make sense when a classmate phrases it differently in the shared notes. People have different mental models, and those differences are assets in a collaborative document.
Group studying fails when it is unstructured. With a clear Google Docs setup, section ownership, a comment-based review process, and a shared question bank, the structure is there. What makes it work is consistency and commitment from everyone involved.
Start the document early in your study period, not two weeks before the exam. The best collaborative study guides are built gradually, reviewed repeatedly, and refined continuously. Give yourself enough time to build something worth having.