How to Build a Semester Study Map from Syllabus to Final
Turn every syllabus into one semester study map: plan backward from finals, spot crunch weeks early, and build review cycles for midterms and finals.
Table of Contents
- Why You Need a Semester Study Map (Not Just a Calendar)
- Reading a Syllabus as a Strategic Planning Document
- What to extract from every syllabus
- Spot the hidden priorities
- Read the topic sequence for dependencies
- Building the Master Timeline
- Step 1: Draw the grid
- Step 2: Drop in every graded item
- Step 3: Find your crunch weeks
- Mapping Backward From Finals to Create a Full-Semester Calendar
- The backward planning template for one exam
- Move start dates earlier for crunch weeks
- Final exams: planning from week 1
- Building Review Cycles for Midterms and Finals Into Your Semester Map
- The simple 1-3-7-21 rhythm
- Two types of review on your map
- Make the midterm a checkpoint, not a finish line
- Turning the Map Into Weekly Action
- Update the map, don't abandon it
- Common Semester Planning Mistakes
- Let the Review Cycles Run Themselves
- Frequently Asked Questions
- When should I build my semester study map?
- What if my syllabus doesn't list exact exam dates?
- How much time should I spend on review each week?
- Should I use a digital or paper semester map?
- How do I handle a cumulative final?
- The Bottom Line
A semester study map is a one-page plan that takes every deadline and exam from all your syllabi, places them on a single week-by-week timeline, and then works backward from each exam to schedule learning, review cycles, and buffer weeks. It takes about two hours in the first week of term, and it replaces the usual pattern of “relaxed until week 6, panicking in week 7.”
I’ll be honest: for my first two years of college I read each syllabus once, filed it somewhere, and rediscovered it the night before the midterm. Every semester had the same shape. Calm, calm, calm, then three exams and a paper in the same ten days.
The fix wasn’t working harder. It was seeing the whole semester at once, early enough to do something about it. That’s what a semester study map gives you, and this guide walks you through building one, step by step.
Why You Need a Semester Study Map (Not Just a Calendar)
A calendar tells you when things are due; a semester study map tells you when to start working on them and when to review. That difference is the whole game.
Most students track deadlines. Very few track the work that has to happen before the deadline. As a result, the calendar looks fine until it suddenly doesn’t.
Here’s what a map gives you that a list of dates can’t:
| Plain calendar | Semester study map |
|---|---|
| Shows due dates | Shows start dates and review dates |
| One course at a time | All courses on one timeline |
| Crunch weeks are a surprise | Crunch weeks are visible in week 1 |
| Review happens before exams only | Review cycles run all semester |
| Finals prep starts in week 13 | Finals prep starts in week 1, quietly |
There’s also research behind the “quietly from week 1” part. Spaced practice consistently beats massed practice (cramming) for long-term retention. A large review by Dunlosky and colleagues (2013) rated distributed practice as one of only two “high utility” learning techniques, alongside practice testing. A semester map is simply the structure that makes spacing possible across 15 weeks. If you want the science behind it and how to choose the intervals, read our guide to spaced repetition.
Reading a Syllabus as a Strategic Planning Document
A syllabus is the professor telling you, in advance, what will be tested, how much each part is worth, and when the pressure points are. Read it like a strategy brief, not like terms and conditions.
What to extract from every syllabus
Sit down with all your syllabi in week 1 and pull out these six things for each course:
- Every graded item and its weight (midterm 25%, final 35%, labs 20%…)
- Every date: exams, papers, problem sets, presentations, quizzes
- The topic sequence: which week covers which chapter or unit
- Whether the final is cumulative (this changes everything about review)
- Exam format hints: multiple choice, problems, essays, open book
- Drop policies and bonus points: lowest quiz dropped, curve, participation
Spot the hidden priorities
Weights tell you where your effort should go. If the final is worth 40% and weekly quizzes are worth 10% total, a missed quiz is an annoyance, while a weak final is a disaster.
A quick way to see it: multiply each item’s weight by how hard it is for you (1 to 3). The highest numbers get the most planning attention.
| Course item | Weight | Difficulty for you (1 to 3) | Priority score |
|---|---|---|---|
| Chemistry final (cumulative) | 35% | 3 | 105 |
| Psychology research paper | 30% | 2 | 60 |
| Calculus midterm | 25% | 3 | 75 |
| History weekly quizzes | 10% | 1 | 10 |
Read the topic sequence for dependencies
Look for units that build on each other. In calculus, derivatives feed integrals. In chemistry, stoichiometry feeds almost everything. Topics with many dependencies need to be solid early, because weakness there compounds for the rest of the term.
Mark those “foundation weeks” on your map. They deserve extra review even if no exam falls on them.
Building the Master Timeline
Put all your courses on one grid: weeks across the top (1 to 15 or 16), courses down the side, and every graded item in its cell. One page, one view.
You can do this on paper, a spreadsheet, or a whiteboard. The tool doesn’t matter. Seeing everything at once does.
Step 1: Draw the grid
Weeks as columns, courses as rows. Add a bottom row called “Load” where you’ll mark how heavy each week is.
Step 2: Drop in every graded item
Write each exam and deadline in its cell. Use a symbol or color for size: big items (exams, major papers) and small items (quizzes, problem sets).
Step 3: Find your crunch weeks
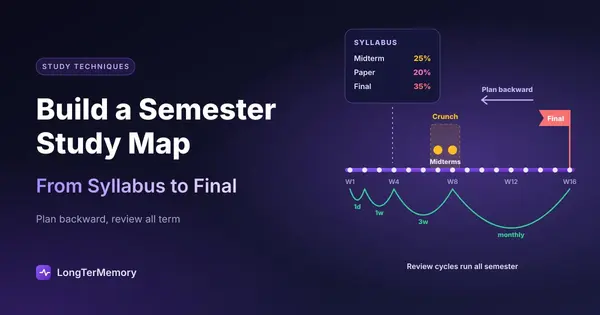
Now look down each column. Any week with two or more big items is a crunch week. Most semesters have two or three: around midterms (weeks 6 to 9) and at the end.
Here’s an example of what typically appears:
| Week | Chemistry | Calculus | Psychology | History | Load |
|---|---|---|---|---|---|
| 5 | Quiz | Problem set | Quiz | Light | |
| 7 | Midterm | Problem set | Proposal due | Quiz | Heavy |
| 8 | Lab report | Midterm | Essay | Heavy | |
| 11 | Quiz | Problem set | Quiz | Light | |
| 14 | Lab report | Problem set | Paper due | Essay | Heavy |
| 16 | Final | Final | Final | Final | Exam week |
The magic moment is seeing weeks 7 and 8 back to back. You now know, in week 1, that week 6 can’t be a social week.
Mapping Backward From Finals to Create a Full-Semester Calendar
Backward planning means starting from each exam date and counting back to decide when content must be learned, when review starts, and when the final practice happens. You plan the end first, then fill in the path to it.
If you want a deeper dive on the method itself, I covered it in how to plan backward from your exam calendar. Here’s how it applies to a full semester.
The backward planning template for one exam
For each major exam, work back from the date like this:
| Time before exam | What happens |
|---|---|
| Exam day | Light review only, sleep well the night before |
| 1 to 3 days before | Full practice exam under timed conditions, fix gaps |
| 1 week before | Mixed practice questions across all units |
| 2 to 3 weeks before | Finish any weak topics, start mixed review |
| All semester | Weekly review of earlier units (spaced) |
Move start dates earlier for crunch weeks
If your chemistry midterm and calculus midterm land in consecutive weeks, you can’t do “1 week before” for both. So shift one of them earlier. Prepare for the first exam of a crunch pair a week ahead of normal, so the second one gets your full attention.
The same goes for papers. If a paper is due in a crunch week, set your personal deadline for the full draft one week earlier and write it on the map in a different color. That personal deadline is the one you actually follow.
Final exams: planning from week 1
For cumulative finals, backward planning reaches all the way to the start of term. A final worth 35% that covers 15 weeks of material can’t be prepared in 10 days without huge forgetting.
A realistic split for a cumulative final:
- Weeks 1 to 13: learn each unit and review it on a spaced schedule (small, weekly)
- Weeks 13 to 14: consolidate summaries, identify the weakest 20% of topics
- Week 15: full practice exams, targeted fixes
- Exam week: maintenance review and rest
Building Review Cycles for Midterms and Finals Into Your Semester Map
A review cycle is a recurring slot where you revisit older material at growing intervals, so by exam time you’re refreshing rather than relearning. On the map, review cycles are the rows that never stop.
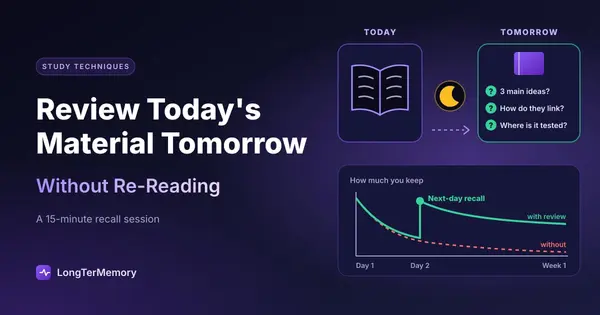
Here’s the problem they solve. Ebbinghaus’s classic forgetting curve, replicated by Murre and Dros in 2015, shows that a large share of new material fades within days if it isn’t revisited. Without review cycles, your week 2 content is mostly gone by the week 8 midterm.
The simple 1-3-7-21 rhythm
For each lecture or unit, plan short reviews at roughly:
- 1 day after learning
- 3 days after
- 1 week after
- 3 weeks after
- Then once a month until the final
Each review is short: 10 to 20 minutes of active recall (answering questions from memory), not rereading. Over a semester, it adds up to a lot of retention for very little time.
Two types of review on your map
I like to put two types of review slots on the map:
| Review type | When | Length | What you do |
|---|---|---|---|
| Daily micro-review | Every study day | 15 to 25 min | Answer due flashcards across all courses |
| Weekly unit review | Fixed slot, e.g. Sunday | 60 to 90 min | Practice problems or essay outlines on older units |
| Pre-exam cycle | 2 to 3 weeks before each exam | Increasing | Mixed questions, practice tests |
Make the midterm a checkpoint, not a finish line
The biggest semester mistake is treating the midterm like the end of that content. Then the final arrives and weeks 1 to 7 are a blur.
Instead, after each midterm, do two things:
- Go through your mistakes and turn every one into a question card
- Keep the midterm units in your review cycle, just at longer intervals
That way, your midterm prep becomes the first half of your final prep. You do the hard work once.
Turning the Map Into Weekly Action
The semester map is strategy; your weekly plan is execution. Every Sunday, look at the map for the next two weeks and turn it into specific tasks.
A 15-minute Sunday routine:
- Look two weeks ahead on the map. Anything big coming?
- List this week’s learning tasks (lectures, readings, problem sets)
- Add this week’s review slots (daily micro-review plus one weekly review)
- Add any “start early” tasks for upcoming crunch weeks
- Put everything into actual time slots
If you want a template for the weekly layer, this guide on building a weekly study routine pairs well with this.
Update the map, don’t abandon it
Dates move. Professors push exams back. You get sick. When that happens, update the map in five minutes instead of starting over. A messy, updated map beats a beautiful, outdated one.
Common Semester Planning Mistakes
The most common mistakes are planning only for exams, ignoring crunch weeks until they arrive, and treating review as optional. Here are the ones I see most often:
- Only mapping exams, not assignments. Papers and projects eat the same time as exam prep, especially in crunch weeks.
- No buffer weeks. Leave at least one lighter week before each crunch period. Something always slips.
- Equal time for every course. Use weights and difficulty. A 10% quiz series doesn’t get the same hours as a 40% cumulative final.
- Reviewing by rereading. Rereading feels productive but produces weak recall. Answer questions instead.
- Skipping the map because “this semester is light.” Light semesters still have crunch weeks. You just don’t see them yet.
Let the Review Cycles Run Themselves
The hardest part of a semester map isn’t building it; it’s keeping dozens of review cycles running across four or five courses at once. Tracking which lecture needs reviewing on which day gets complicated fast.
That’s the part I stopped doing by hand. With LongTerMemory, you upload your lecture slides, notes, or PDFs, and it generates question and answer cards automatically, then schedules every review with spaced repetition. Your “daily micro-review” row on the semester map becomes one action: open the app and answer what’s due, across every course. It saves the hours you’d spend writing flashcards, and the free trial is long enough to test it through your first review cycle of the term.
Frequently Asked Questions
When should I build my semester study map?
In the first week of the semester, as soon as you have all your syllabi. Two hours in week 1 saves dozens of stressful hours later.
What if my syllabus doesn’t list exact exam dates?
Put a placeholder in the most likely week (midterms usually fall in weeks 6 to 9) and update it when the date is announced. A rough date is still better than none.
How much time should I spend on review each week?
A good starting point is 15 to 25 minutes of daily review plus one 60 to 90 minute weekly session. Increase it in the two to three weeks before each exam.
Should I use a digital or paper semester map?
Whichever you’ll look at every week. Many students like a printed one-page grid on the wall plus a digital calendar for the weekly details.
How do I handle a cumulative final?
Start reviewing from week 1 with spaced review cycles, keep midterm content in rotation after the midterm, and reserve the last two weeks for mixed practice and full practice exams.
The Bottom Line
A semester study map turns five separate syllabi into one clear plan: every deadline on one timeline, every exam planned backward, and review cycles running all term. You see crunch weeks before they happen, start big tasks early, and walk into finals refreshing what you know instead of relearning it.
This week, gather your syllabi, draw a 15-week grid, and drop in every graded item. Then circle your crunch weeks. That one page will change how your whole semester feels.